Showing posts with label DIY. Show all posts

Thursday, 22 December 2011

DIY: STUDDED WEDGES

Wedges are the perfect solution for me in footwear terms, they give me that neccessary boost of height and that lovely apparent lenghten of the leg without leaving me with a lack of stability and awfully swollen feet. 

Therefore upon finding this gorgeous pair of plain black wedges, conveniently the day before I was going to head off to Clothes Show, I was incredibly over-excited and began swooning like some sort of shoe-addict (which I, of course, am not!)

Anyway my new addiction to SuperGlue (sounds way worse than it actually is) led to me planning my next DIY project. 


ALL YOU'LL NEED
     +plenty of small thin rustic looking studs (in this case, I've taken studs that were once on a dress)
     +Superglue
      +and a steady hand and some patience is always useful too!


My chosen studs PLUS...


...some trusty adhesive to stick the studs to the heel of the wedge. I chose to create a line of studs along the seam between the heel and the suede of the actual shoe.


And your done, easy as that! An expensive looking pair of wedges for (as long as the original wedges you buy are cheap, mine were £10) a tiny price. Not forgetting you could get yourself a lot more wear out of a pair of shoes you feel you've 'over-worn'.

FAYE XOXO


Tuesday, 4 October 2011

DIY: BROGUES ft. AUTUMN RIBBON

EXHIBIT A: a rather scruffy looking pair of plain, Primark brogues

you will be needing
+lace up shoes (heels, wedges, brogues, creepers)
+ribbon (two preferably but you can cut them)
+needles and thread (for threading the ribbon through laces holes)


Firstly you need to remove the existing laces on your chosen shoes. As you undo them, try to remember the pattern in which the laces go through the laces holes so as you can copy this with the ribbon. Otherwise you can find yourself in a bit of a pickle and with a rather messy looking shoe.


Then take a ribbon of any colour and texture (but preferably fairly thin - for your own good, believe me!) and attach a needle to each end of the ribbon. This is OPTIONAL, you can thread the ribbon through by hand, but with thicker ribbons the needle makes the job a lot easier and quicker - which we like!


Now begin poking the ribbon through the laces holes to form the same (or different if your feeling adventurous) pattern. This may take some force as ribbon is a lot thicker than laces but with patience and a bit of elbow grease, it should work. 


Et voila! We have our very girly, upcycled shoes. You can choose to keep the bow or tuck in the laces for a less 'pretty' look. 

You can do this with different coloured ribbons or even lace to stop the need to throw out your old shoes.

Thanks so much for reading, I love hearing from you all!


Tuesday, 27 September 2011

DIY: what to do with broken necklaces...


It's happened to most of us: you're going about your everyday business, whilst subtly showing off a new or favourite necklace, when the first thing you here is a quiet (but painful) 'pitter-patter' of beads and then lying on the ground before you is your beloved jewellery in a jigsaw-like fashion. 

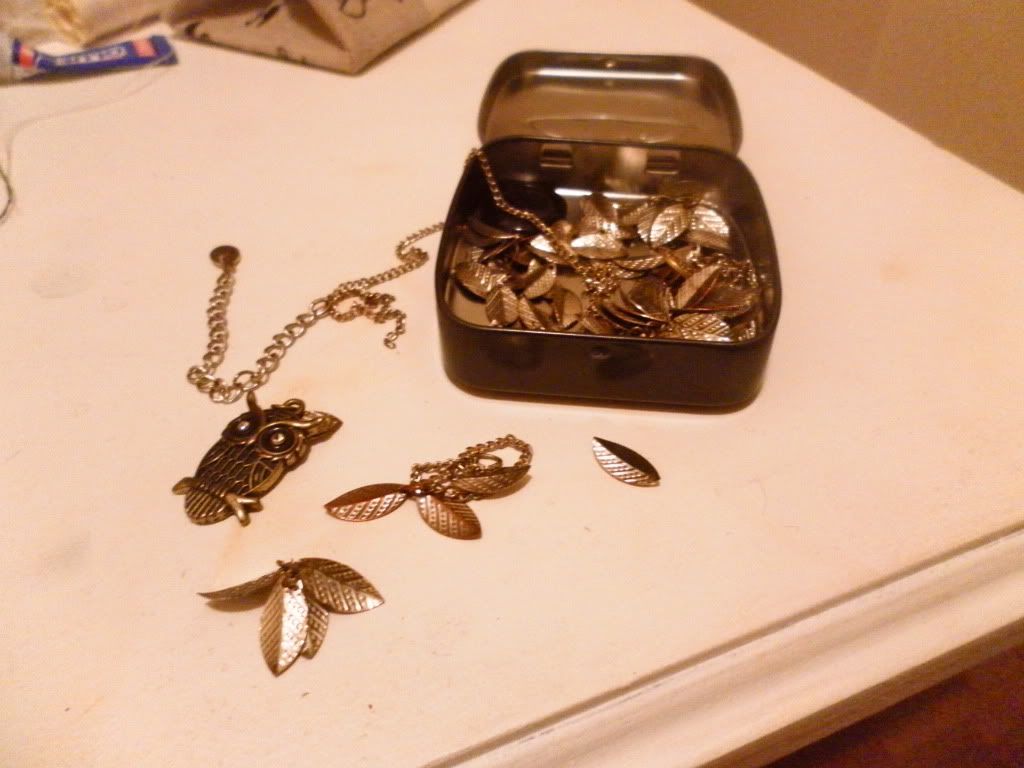
As I'm guilty-as-charged of never throwing anything away I like to keep these scraps for 'future DIY projects'. Due to typical teenage laziness these broken gems have built up in a little tin. Along with the fear of opening the tin and them falling out everywhere, I've never really known what to do with them so I haven't touched them. 

However, over the past few weeks I've been mentally collecting ideas on what to do with them, here's a few!

1. Brightening up an old purse, make-up bag or pencil case.

Pearls look great with girly pretty fabrics, rustic chains compliment neutral colours and gold and silver eccentric-looking pendants are perfect with plain fabrics. 

Here I sewed on a broken pearl necklace using white thread to match, I left the middle pearls loose.
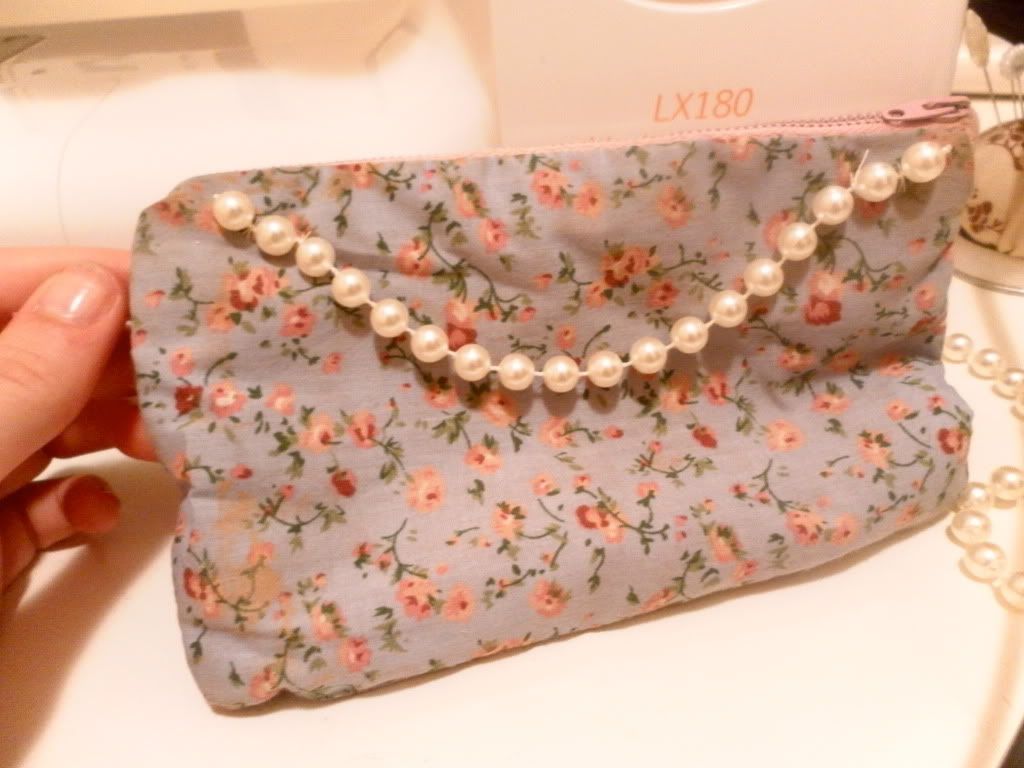
2. Edges of scarves

Adding textures to a scarf can make it appear brand new or just add a little something so its different to everything you can buy in the shops.

I added some tiny golden leaves to the end of a triangular scarf/shawl simply using a needle and thread. Make sure to use a needle with a small eye so as it can pass through any tiny holes. 
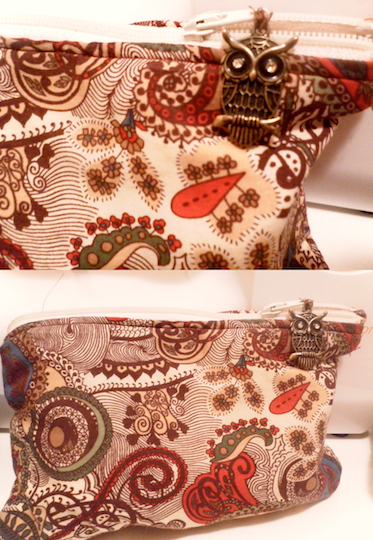
3. Zip decoration

A chain breaks and you're left with a pretty pendant with no home (sad face), the perfect place to put them is on the end of zips. Whether on clothing, purses or bags. 

I took a rustic looking owl pendant (it's chain has literally disappeared!) and attached it to a zip of a home-made makeup bag using matching brown thread. 
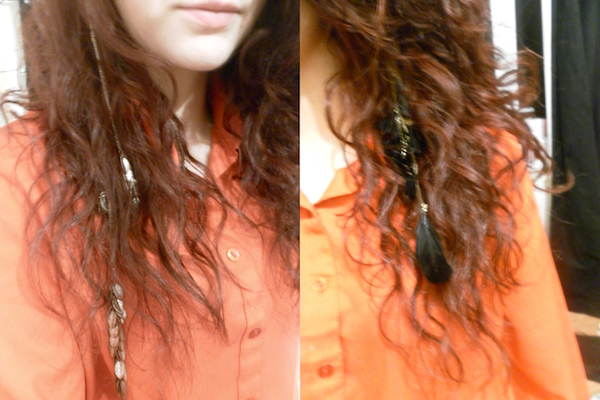
4. Hair accessories

If paired with the usefulness of tiny elastic bands, mini clips and bobby pins useless necklaces can be put to work in your hair. Feathers scream boho and the golden leaves, pictured above, are subtle but VERY pretty. 

I love these types of hair accessories to wear at school: they allow you to be a little different but are discreet enough to follow those tedious school rules!
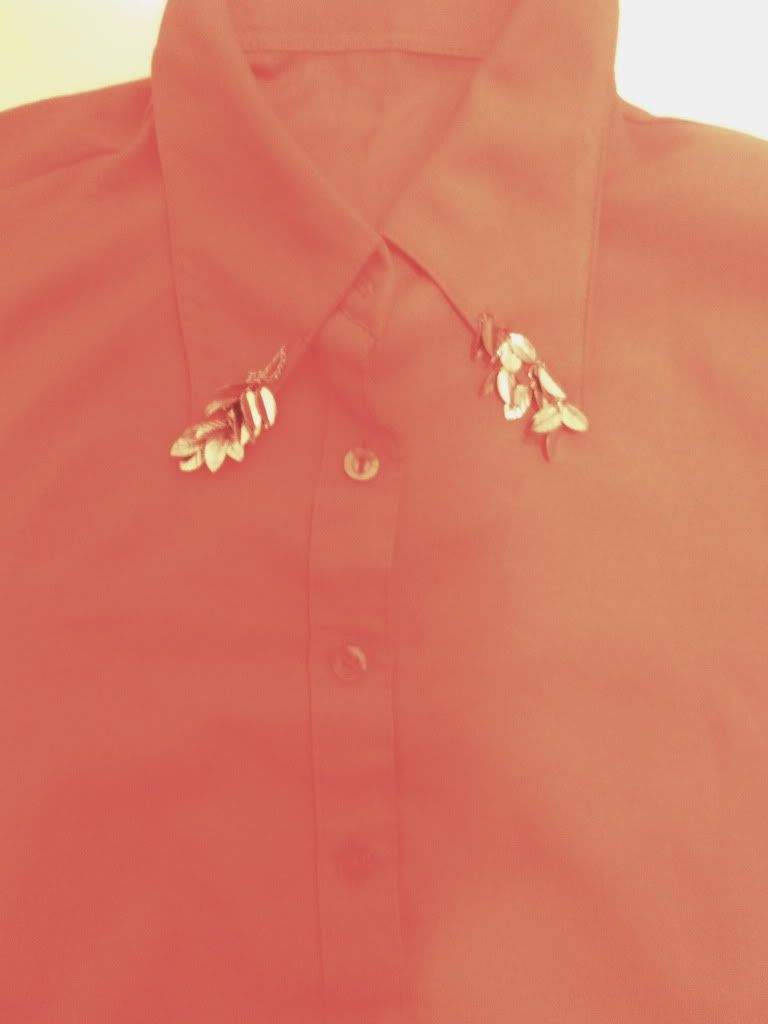
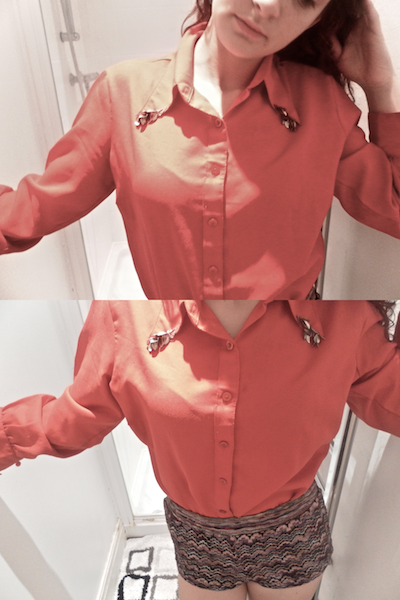

5. Collars

I love shirts, they're a definite wardrobe staple and there's so many different ways to make them stand out. Cuff links, big bold buttons, rips and tears or collar embellishment - my favourite!

Again, I've used this leaf necklace (yes it was a very long necklace aha!) to add a different texture to the otherwise rather plain shirt. I did this with a needle and thread but you could maybe try it with fabric glue.

___________________________________


Thanks so much for reading, sorry its such a long post but I've really enjoyed gathering ideas and trying out new DIY's!


Saturday, 24 September 2011

VINTAGE IS THE NEW BLACK: AN UPCYCLE

A few weeks ago my regular, aimless, lunch-break wanderings led to my barrrrrrrgain vintage discovery within the dark but wonderful corners of a local vintage shop.

Squashed onto a tiny rail packed between a few knit cardigans and chiffon shirts was this BEAUTIFUL little black dress.

A figure pleasing strapless dress with a striking lace neck piece and sleeves - perfect! However as with all vintage clothes, this piece needing updating... UPCYCLING. 

Vintage cuts never quite cut it (painful pun, sorry!) in modern day. The hemlines and lengths can be obviously old-fashioned and the fit can accentuate all the wrong parts. So, I grabbed my scissors, thread and (not literally this time) my sewing machine.

 About an hour later I had a subtly re-vamped black dress...


The hemline was shortened to a much more flattering 21st century shape and the gothic over-kill sleeves were snipped away. 

The sleeves fall beautifully, copying the pretty 'lampshade' shape of the skirt part of the dress. I'm still undecided on whether to keep this shape or add darts to the skirt, creating a more sophisticated silhouette. What do you think?

I'm really pleased with this; a practical, timeless LBD, unique to myself for £10!

Thank you for reading, I hope this has helped you open your eyes and think forward when looking at un-shapely vintage dresses, there's potential in (almost!) anything. 

p.s please look at for a future post involving the cuttings of the sleeves, think hats and the 1920's!


Monday, 19 September 2011

DIY: BIKER BOOTS ft. CROCHET

EXHIBIT A - BIKER BOOTS

Check these biker boots I brought last weekend! I've been needing a new pair for yonks and I found this grungy looking ones in a cheap shop which led to my spontaneous-buy-of-the-week. 

However, I wanted to make these a little different so here comes this mini, VERY EASY DIY!

you will be needing:
booties 
crochet ribbon/lace
superglue

I say superglue, but you could choose to pin or sew on the lacey/crochet ribbon - it's up to you. I find that superglue is quicker, easier and stronger though. 

I'm going to be placing the crochet ribbon on the tongue (I think that's what its called!) of the boot. So I need to cut a piece of ribbon the length of the widest part of the tongue. Comme ca..

(obsessed with this ribbon right now, I've sewn/stuck it onto basically everything I own!)

Now you can experiment with where you want the ribbon to go: top, bottom, or middle. Or maybe even on the back! Temporarily pin the lace down and try them on (obviously avoiding injuring!) to see which looks best for you. 

(poorly focused picture sorry!)

I chose to place mine at the top of the boot's tongue. Now glueing may begin!


Apply a generous layer the the front and a little bit of the back of the tongue. BE CAREFUL THOUGH, carelessness or excess glue can lead to a nasty layer of it all over your hands (bad past experience).  

Let the glue dry and make sure all the little frayed threads are firmly placed down and then we're finished - already!


EXHIBIT B - GRUNGY/GIRLY BIKER BOOTS. 

I find the lace makes the boots easier to wear with skirts and dresses. 
Hope you've enjoyed this mini tutorial and I'd LOVE to know if you try this!

Take care

Wednesday, 14 September 2011

MINI DIY: TWISTED BANDEAU

EXHIBIT A

This odd half-top appeared in my bedroom after the usual 'I-found-loads-of-your-rubbish-everywhere-Faye!' lecture from my mum. It's made from a gorgeous stretchy jersey fabric and I could smell a pretty bandeau top as soon as I looked at it. (don't ask where the other half is, I'm clueless)


I didn't cut the sleeves off completely for two reasons: one being that that would create a vest shape and I didn't want a vest and two, you'll find out later... I was aiming to cut the top into a simple rectangular shape as thats what I'd need for the basis of a bandeau. 


I cut the polo-neck off (never been a huge fan anyway) and then I had a nice stripey bandeau shape. After pinning and eventually sewing down one side of the bandeau I twisted the fabric to form a bow-like shape. Sewing down the other side so that the seam is facing outwards and the stitching is on the inside can prove a little tricky, but enough thought and practice about it should give you a good result. 

 EXHIBIT B (also featured on my new winter, spring, summer, autumn banner) 

Pair up with a strapless bra (or not if you're that lucky) and layer up! I'm aware its not really the time of year for bandeaus, but they're useful especially if your Australian and just approaching Spring!


Now, this is why I left some of the sleeve on to get this clashing stripe pattern under each arm, just something different from bandeaus in the shops. 


Pretty twist!

Thanks for reading, why not grab an old stretchy top and bandeau-ify it!

xxxxxxxxxxx


Sunday, 11 September 2011

DIY: TOP-TO-SKIRT

EXHIBIT A

After rooting through my overcrowded wardrobe (so overcrowded in fact, things are bursting out of it) I came across this top I hadn't worn in years - literally its age 12... I absolutely adore this dusty pink colour and chiffony-type material is my favourite so I obviously, since the recent purchase of my sewing machine, had to upcycle this baby!


I unpicked the odd flower attachment thing (my fashion opinions have changed since i was twelve, surprisingly!) and cut along the seam between the top part and the bottom part of the top (try saying that quickly 10 times...).


I re-sewed the seam of the skirt and added a gorgeous crochet/lace finish at the top of the skirt. I'm obsessed with this at the moment - I've brought about 10 metres worth! I also re-did the fastening of the skirt with press-studs.

EXHIBIT B

And finitoooo, we have a chiffon-ish, dusty pink skirt!


Thanks muchly for reading, I really hope this encourages you to take something old and make it new and all at a teeny-tiny price!